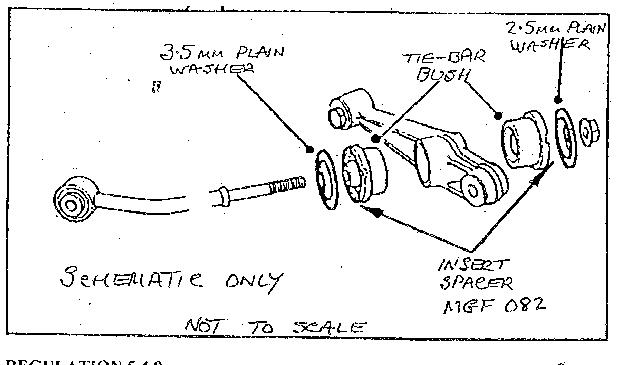
Assembling of the Compliance Washers
| Montage der Abstandscheiben/
Assembling of the Compliance Washers |
|
Es wird einem fast
übel dabei, ... Wir (ich) wissen es
nicht. Jedenfalls ist das bei den Racing Ausführungen des MGF anders
gelöst. Hier übernehmen feste Nadellager die Funktion des grossen
Gummilagers. Mir gefällt es nicht und darum probiere ich halt auch
mal aus, wie das funktioniert. Kann sein, dass es nicht gut für die
anderen Lagerungen ist. Egal, ich weis dann aber, wer es (selbst) zu verantworten
hat. :)) A. PU Buchsen
von Powerflex, z.B. erhältlich in DE bei Fritz Schmidt. |
The
traktion of the engine to the cars wheels let them move the wheels forward
and backward related to the cars body. In our MGF case is the subframe
involved. The lower and upper wishbones can't hold this force alone. They
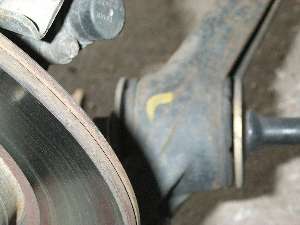
get supported by a tie bar which is attached at the MGF to the lower wishbone.
This tie-bar is fixed
on both sides of the wishbone with rubber-metal dampers which carry movements
in all directions. The main movement is to the front and rear. The damping
function is very weak at the MGF. The tracking angels change by one or
more degrees under hard acceleration/decelleration. You will nearly get
sea sick on looking at this tracking changes, do you ? The currently availiable
options are: |
 |
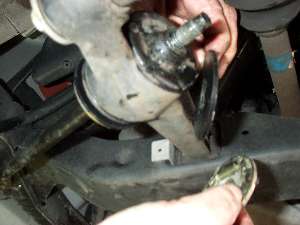
Die 18er
Mutter am Gummilager lösen. Dabei die Stange mit einer schweren Pumpenzange
gegen Mitdrehen sichern. Das 'eingebaute' Spiel zwischen Gummiblöcken und den gelb verzinkten Anschlag- bzw Druckscheiben ist hier aufgezeigt. |
Loosen
the large nut wit a 18mm wrench. Hold against with a large gripper to prevent
torque bends at the subframe. Look at the built in play between the yellow steel waher and the rubber-metal damper at the standard setup |
|
 |
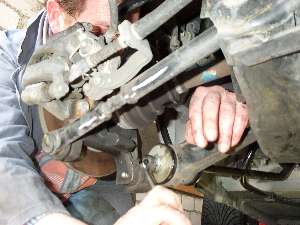
Die 13er Schraube zur Befestigung der Zugstange hinten herausdrehen. Sehr mühsam, da man schlecht drankommt. Ggf 1/4 Zoll Knarre mit Gelenk verwenden . | Loosen the rear fixture bolt at the tie bar. 13mm and pull it off. This is difficult, cause it's hard to reach. (use a universal socket at a 1/4 inch wrench if possible) | |
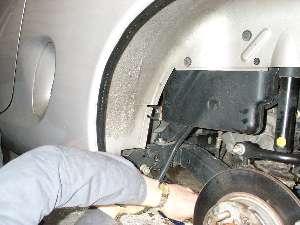 |
Eine unbequeme Arbeitshaltung. | No easy works location | |
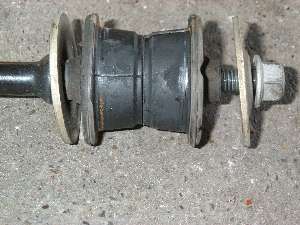 |
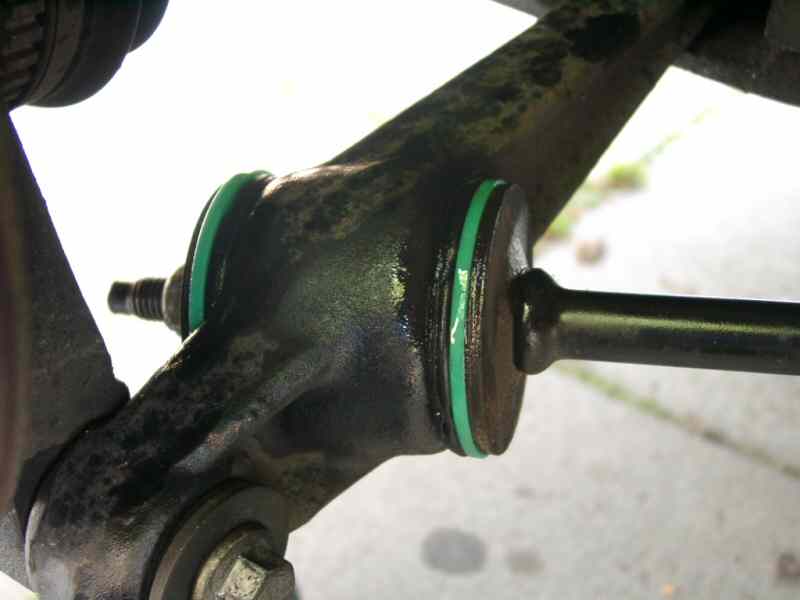
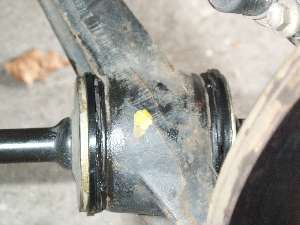
Die Lagerseite der Zugstange, demontiert. Im montierten Zustand ist die Mutter mit 80Nm angezogen und presst die innen liegenden Metallhülsen fest zusammen. | See the
standard bearing set of the tie bar to the lower arm. The inner metal pipes of the rubber-metal damper is pressed to each other if assembled with a torque of 80Nm to the nut. |
|
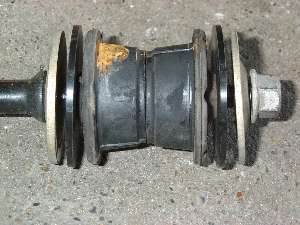 |
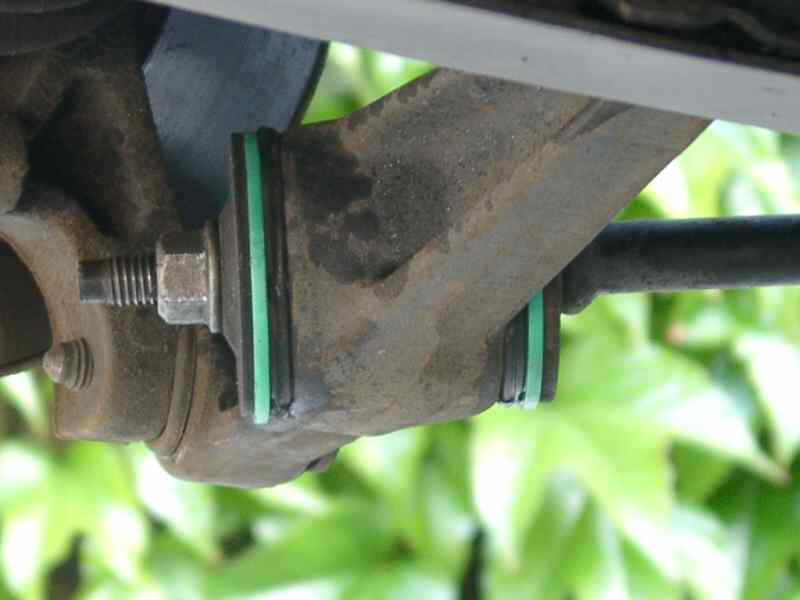
Zur Demonstration habe ich hier ein Foto des Lagersatzes mit den Abstandsscheiben gemacht. | This picture shows the location of the added compliance washers (black) | |
 |
Zum Wiedereinbau der Zugstange: |
Up
to re-assemble the parts Put loads of lithium grease to all parts |
|
 |
Die 18er Mutter wieder mit 80Nm anziehen. | Tighten the 18mm nut with 80Nm torque. | |
 |
Das Ergebnis. | The works result. | |
|
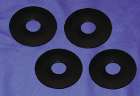
Diese
alternativen grünen Spielausgleichscheiben sind aus speziellem zähem
Kunststoff gedreht. (Bilder von Markus)
Wer da nicht drankommt, der kann es auch mit Glockendichtungen aus Gummi für Toiletten Spülkasten Typ *GEBERIT* aus dem Klempnerzubehörladen. Das ist dann aber eben nur Gummi. |
The green coloured
washers on the left got machinen from best (ultra-macromolecular, low-pressure polyethylene) Murdtfeld Typ S |
|
| Zum Schluß
die Spur einstellen lassen. Da die Hinterachse sich nicht mehr durch Traktion bewegen lässt, sollte man dieses durch mehr Vorspur kompensieren. Also hinten nicht Spur Null sondern z.B. +0°10' Vorspur |
At last the tracking must be adjusted. The rear axles do not move any longer related to engine traction. In this case you should compensate this with more toe IN. Never do Toe Zero, but +0°10' Toe IN (+5 minutes each wheel) |
||
| From: C Golvala Greater
London United Kingdom cgolvala@........com on 28 April 2003 at 11:42:35
(UK time) Following on from the mostly successful fitting of the Polyflex damper bushes, I tackled the rear tie-bar bush. As guidance I had a couple of old threads, including Roger Parker's instructions for fitting compliance washers, and Dieter's pictorial guide. It was not as easy as all that for this amateur, so here are some notes for those interested: 1) You need a deep 18mm socket for the rear nut and plenty of elbow grease. These are hard to come by, but Teng Tools do one that is stocked by the larger Halfords. 2) The recommendation from Dieter to hold the tie-bar whilst undoing this nut cannot be emphasised enough. When I had to resort to a garage, their air-tool could not shift the nut because the flex in the bushes absorbed all the torque. 3) Dieter talks about using a "Cardan" spanner for the 13mm bolt that holds the tie-bar to the subframe. I bought a "deep-offset" ring spanner from Halfords for the job, because there is not enough room to get a socket and ratchet head onto the bolt. The garage used a socket with a long allen key as the handle - good idea, though the deep offset spanner will do the job. 4) The 13mm bolt is harder to reach on the right-hand side of the car because of two fuel hoses that have to be gently pushed out of the way. On both sides, the lip of metal running underneath the bolt and the lack of space between the bolt and neighbouring bodywork, made it impossible to get a torque-wrench to the bolt. Unless anyone else has a bright idea and posts it here, forget about torquing this to 45Nm. 5) I started on the left-hand side of the car because of those fuel lines and was able to remove the 18mm nut and 13mm bolt without too much difficulty. The head of the tie-bar needs to be wiggled out by pulling down on the bar (which needs movement in the bush), turning it 90 degrees and then pulling forward to get the bar out of the lower suspension arm. 6) This is where I came unstuck. Although I cleaned out rust from the socket in the lower suspension arm, I could not push either half of the Polyflex bush all the way in by hand. I tried to use a G-clamp but the sloping washers made this impossible. The result was that I could not get the front of the tie-bar into its subframe mount or the rear nut onto the tie-bar so as to squeeze the bushes into the arm. 7) The garage suggested (though in the end did not use) threading a bolt through the bush and tightening a nut on the end to force it into place. But you would then have to fit the tie-bar through the bush without dislodging the bush, which would be difficult (see removal method above). 8) I suspect that even if I had got the front half of the bush in all the way, the thickness of the bit of bush that does not go into the socket would have meant that the head of the tie-bar would not line up with its the subframe mount, until the bush had been compressed. If you can get this far, then I think you would have to put the rear 18mm nut on first, tighten it until the head of the tie-bar lines up with the mount and then put in the 13mm bolt. This is a variation on the compliance washer instructions and is what the garage did for me. 9) Finally, after putting the old bushing back together and lowering the car, I found that there is not enough room underneath to move the torque wrench arm sufficiently to click, at 80Nm or even a lower setting. Again, as with the rear damper nut, I cannot see how you do this without a pit. The good news is that the mod certainly works a treat, with the cornering security much improved. The bushes compress into a shape that I can only call beautiful (you'll see!) and hold the rear wheel toe-setting much better. The garage recommended that I come back in 200 miles for tracking since the bushes will take a few miles to settle in.
Picture courtesy John Thomas (1999) |
back or to my MGF home site www.MGFcar.de
|
|
   |
||||