MGF/TF Rear Plastic Window or replacement with glass window heated
This is from
theory only.
See in the flesh at http://leisure.prior-it.co.uk/replace-mgf-window.shtml
1997 gab es eine Änderung am Softtop, die die Heckscheibe betraf. Die Scheibe am87 ist geringfügig größer und hat einen anderen Reissverschluss.
- Man muss nicht gleich alles ersetzen wenn ein Reisverschluss defekt wird. Es gibt Ersatzteile z.B. in UK bei mgfmania. (Sonia)
- Auch die defekte Heckscheibe kann beim lokalen Autosattler durch einnähen einer PVC Scheibe repariert werden.
Notice: The MK2 newer softtop supplied to the MGF from 1997 upwards
has a differnt rear window.
(ZIP and screen hight, see below the hint of Mike Satur related to re-use
the old ZIP)
- You need not replace the suggested complete part, cause good hood repair
workshops will also be able to sew a new plastic screen only to replace
a broken screen.
If you decided to get a replacement set from MGR or Mike Satur or B&G
then read at first the following instructions.
Werkzeug:
- Bohrmaschine mit Bohrern 3,5 bis 4,1 mm
- Hand-Popnietzange mit passendem Mundstück für die Niete
- electric drill with drills from 3.5mm to 4.1mm
- hand riveting tool with front insert for your blind rivets
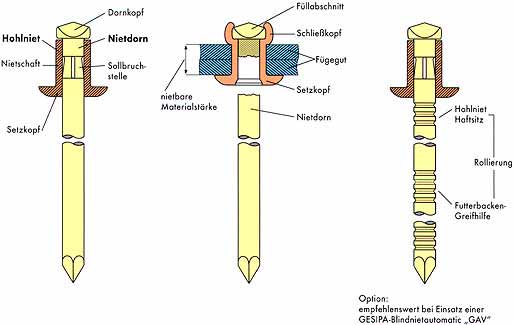
- neue Heckscheibe als Kit
- 3,5mm Pop-Niete 15mm lang
(Flachkopf/Alu-Edelstahl).
Die sind meist garnicht verfügbar. 3,8x15mm oder 4x16mm Popniete tun es auch.
- new rear screen kit
- 3.5mm pop blind rivets 15mm long (flat head, aluminum/stainless steel) These are quite unusual and not available. Use 3.8mm rivets with length of min. 15mm (or 4x15mm will do)
See at ebay for long rivets in black colour.
Notice, the following crap description is content
of the official workshop manual.
Don't beleave all, but check yourself !!
Dismantle
-. Lower both windows. OK
-. Release both front hood catches, but do not lower hood. OK
-. Release rear edge of hoodwell carpet and release 5 clips. OK
-. Fold rear of hood, up to release from body. OK
CAUTION: Clips must be fully released to ensure that rear screen is not
damaged. OK
-. Unzip rear screen. OK
-. Lay rear screen flat in hoodwell. OK
-. Place protective covering over rear screen and boot. OK
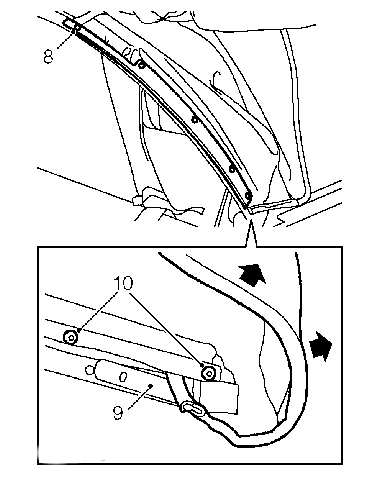
-. Remove 2 rivets securing ends of hood rear quarter retaining strips.
??????
-. Carefully bend back ends of strips to reveal blind rivets. OK
-. Drill out 13 pop blind rivets securing rear screen retaining strip.
OK
-. Collect retaining strip and remove rear screen.
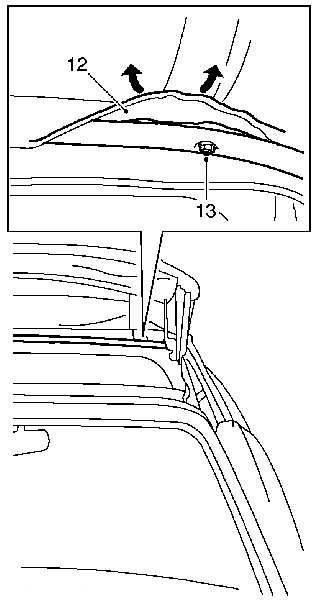
-. Release felt covering from 3rd hood bow.
Remark from Mike Satur at the BBS due to this fuzzling description...
From: mike on 16 February 2002 at 13:28:58
The black felt is indeed well stuck so don't bother to try and remove
it as it will end up in several small pieces, use a craft knife and slot
the felt where there is a nut in the hood bow, you can feel this by pressing
on the felt, when the 7 nuts are released cut along the felt at the front
edge with a sharp craft knife to separate the two sections, release the
side bolts/screws that hold the bow in place and lower it to release the
clamp rail.
This was covered in an article I did for MG World if anyone can help with
the issue number.
HTH Mike.
BTW, you could remove the zip from the old screen and then sew this to
the new one making sure the alignment is the same, this would save all
the fussing about, depends if the zip is still serviceable though.
-. Remove 7 nuts securing outer cover clamp rail
-. Partially lower hood frame. OK
-. Release clamp rail studs from hood frame.
-. Lay protective sheet over rear screen, luggage compartment lid and
seats.OK
-. Release foam from ends of zip retainer to reveal pop blind rivets.
-. With assistance to hold outer cover aside, drill out 9 pop blind rivets
securing zip retainer to hood frame.
-. Remove rear screen zip.
Refit
-. Drill out any rivet heads still captive in hood frame. OK
CAUTION: Clear away swarf from protective covering to ensure that
new rear screen does not become scratched. OK
-. With assistance, position rear screen to frame, centralise and transfer
holes into rear screen. OK
-. Position rear screen to a soft covered work surface. OK
-. With careful use of a drill, enlarge holes to 3.5mm OK
-. Position rear screen to frame, align retainer and secure with pop blind
rivets.
NOTE: Start at the centre location and work outwards. OK
-. Secure ends of rear quarter retaining strips with blind rivets.
-. Position zip assembly to frame and secure with blind rivets.
-. Fit foam pads to both ends of hood bow. OK
NOTE: Foam pads are designed to prevent outer cover being damaged
by ends of hood bow and zip retainer.
-. Position outer cover clamp rail to frame and engage studs.
-. Raise hood, but do not secure catches. OK
-. Secure outer cover, clamp rail with nuts.
-. Apply adhesive to 3rd hood bow and mating surface of felt covering.
CAUTION: Ensure underside of outer cover does not become contaminated
with adhesive. OK
-. Bond felt covering to 3rd bow, ensuring that slots are correctly positioned
around frame straps.
-. Remove protective covering. OK
-. Raise rear screen into position and secure with zip. OK
-. Engage clips to secure rear of hood to body. OK
-. Engage hoodwell carpet beneath flip seal OK
-. Secure hood catches. OK
-. Raise windows. OK
Softtop OEM http://www.pininfarina.it/eng/