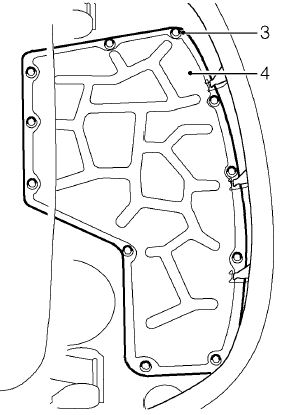
ENGINE COVER
Service repair no - 12.37.04/99
Remove
1. Remove hoodwell trim. See BODY, Interior trim components.
2. Remove sound deadener pad.
3. Remove 11 bolts securing engine cover.
4. Remove engine cover.
CRANKSHAFT PULLEY - MANUAL GEARBOX
1. Disconnect battery earth lead.
2. Raise rear of vehicle.
WARNING: Support on safety stands.
3. Remove road wheel(s).
4. Remove alternator drive belt.
---
ALTERNATOR DRIVE BELT - NON AIR CONDITIONING
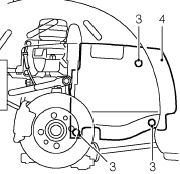
3. Remove 2 scrivets and Torx screw securing closing panel.
4. Remove closing panel.
---------
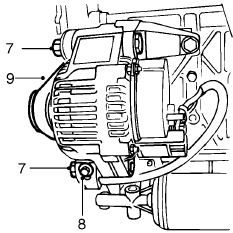
6. Loosen bolt securing alternator adjustment bracket.

7. Loosen 2 alternator clamp bolts.
CAUTION: Ensure that bolts are loosened sufficiently for alternator to
move freely.
8. Loosen adjusting bolt until there is sufficient free movement in belt
to remove.
CAUTION: Do not apply excessive torque to adjusting bolt or damage to
bolt will
result. If bolt appears to be seized or is difficult to turn, apply suitable
anti-seize lubricant to bolt.
CAMSHAFT TIMING BELT - MPi MEMS 1.9 (UP TO 2000MY)
NOTE: Two types of timing belt tensioner are fitted, type A is a manual
tensioner, type B is an automatic tensioner. The tensioners and their
timing belts are not interchangeable.
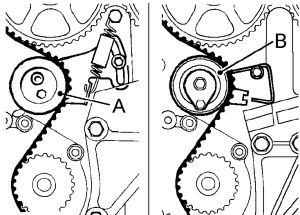
The following
description relates to type A tensioner. The manual.
Unfortunately I found the type B automativ tensioner when I removed the
upper cam wheel cover.
So this site
is not completed, it's just the theory !!!!
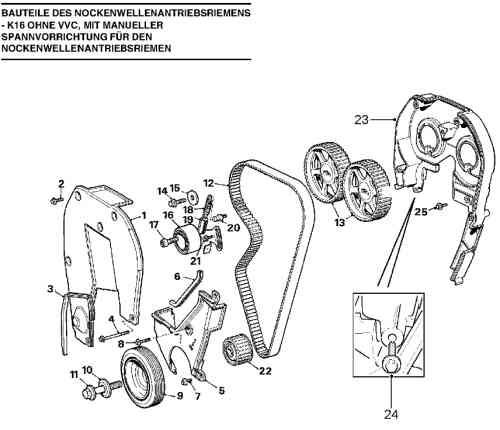
CDU2749 Belt-engine timing - 23mm wide (manual tensioner)
LHN100560 Belt-engine timing - 26mm wide
CAUTION: Timing belts must be replaced if cylinder head is to be removed
or new timing gears, tensioner or coolant pump are to be fitted.
Timing belts must be stored and handled with care. Always store a timing
belt on its edge with a bend radius greater than 50 mm.
Do not use a timing belt that has been twisted or bent double as this
can damage the reinforcing fibres.
Do not use a timing belt if debris other than belt dust is found in timing
cover.
Do not use a timing belt if partial engine seizure has occurred.
Do not use a timing belt if belt mileage exceeds 48,000 (77,000 km).
Do not use an oil or coolant contaminated timing belt.
NOTE: The cause of contamination MUST be rectified.
Removal - Engines fitted with manual timing belt tensioner
1. Disconnect battery earth lead.
2. Raise rear of vehicle.
WARNING: Support on safety stands.
3. Remove timing belt upper front cover.
--------------------------------
1. Remove engine cover. See this section.
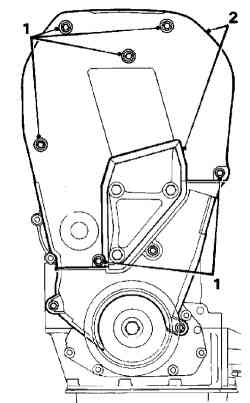
2. Loosen lower fixing bolt securing timing belt upper front cover.
3. Remove 5 bolts from timing belt upper front cover.
4. Remove timing belt upper front cover and seal.
---------------------------------------------
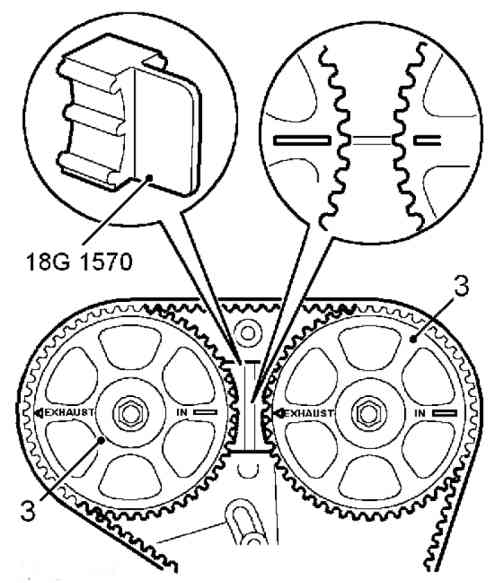
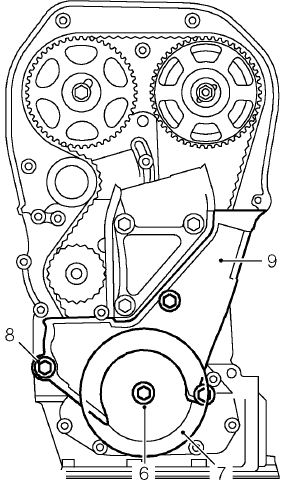
4. Using a socket and extension bar on crankshaft pulley bolt, rotate
crankshaft clockwise and align camshaft gear timing marks with mark on
backplate - 90° BTDC
Make sure you set the cams with the markers on the pulleys facing each
other.
Also put a reference mark on the crank pulley (the timing notch is on
the BACK flange of the crank pulley don't be confused by the one on the
front flange!)
5. Fit camshaft gear locking tool 18G 1570.
CAMSHAFT TIMING BELT REAR COVER - MPi AND VVC - MANUAL MODELS
Remove
1. Remove camshaft timing belt gear. See this section.
2. Remove bolt securing second cam gear to camshaft and remove gear.
3. Remove alternator drive belt. See ELECTRICAL, Repairs.
------------
----------------------------
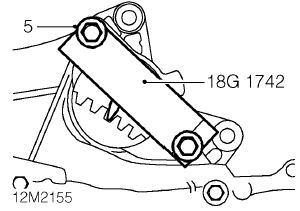
5. Remove starter motor. and Lock crankshaft using tool 18G 1742.
OR
Use an air tool driver with above 250Nm torque to loosen the crank shaft nut/pulley
6. Remove bolt and plain washer securing crankshaft pulley to crankshaft.
7. Remove crankshaft pulley bolt and washer.
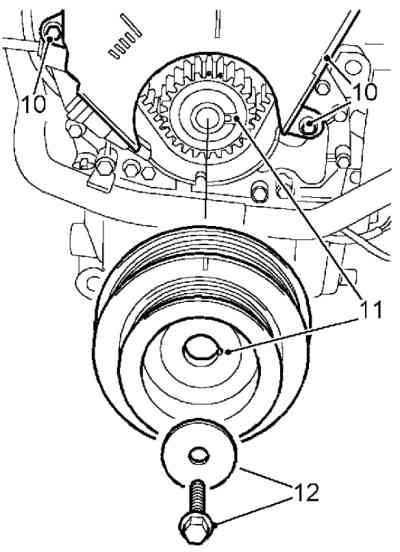
8. Remove crankshaft pulley
8. Remove 3 bolts securing timing belt lower front cover to engine.
9. Remove lower front cover.
----------------------------
9. If camshaft timing belt is to be reused, mark position of tensioner backplate to cylinder head. Mark direction of rotation on belt using chalk.
10. Loosen tensioner pulley Allen screw 1 /2 turn.
11. Loosen tensioner backplate bolt 1 /2 turn.
12. Push tensioner pulley down to fully OFF position and tighten backplate bolt to 10 Nm.
13. Lower engine to allow clearance between RH mounting bracket and engine.
14. Remove camshaft timing belt.
CAUTION: Ease timing belt from the gears using the fingers only, metal levers may damage the belt and gears.
Do not rotate the crankshaft with the timing belt removed and the cylinder head fitted.
-----------------
ENGINE COOLANT PUMP
Remove
3. Drain cooling system. See Adjustments.
------------
Drain
WARNING: Do not remove expansion tank filler cap when the engine is hot. The cooling system is pressurised. Personal scalding could result.
CAUTION: Any coolant spilt on the vehicle’s body must be washed off immediately to prevent damage to the paint work.
1. Position heater temperature control to maximum heat position.
2. Remove expansion tank filler cap.
9. Turn heater temperature control to maximum heat position.
3. Position container to collect coolant.
4. Release clip and disconnect coolant hoses at rear of under floor coolant rail.
5. Allow cooling system to drain.
-------------
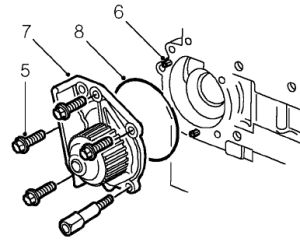
4. Remove bolt securing timing belt rear cover to coolant pump.
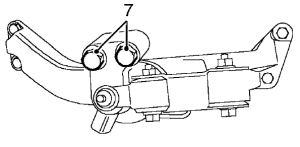
5. Remove 5 bolts securing engine coolant pump to cylinder block.
All straight forward except remember the bolt at '10 O'clock on the water pump flange is removed from the opposite side.
The rubber hoses will be a bit of a pain to remove from the metal coolant pipes, be careful not to damage the rubber pipes.
6. Release pump from 2 dowels.
7. Remove engine coolant pump.
8. Remove ’O’ ring seal from pump body and discard.
Refit
1. Clean pump and cylinder block mating faces.
2. Fit NEW ’O’ ring seal to pump body and fit pump to cylinder block.
3. Fit bolts securing engine coolant pump to cylinder block and tighten to 10 Nm.
4. Fit bolt securing timing belt rear cover to engine coolant pump and tighten to 10 Nm.
6. Support engine on a jack.
CAUTION: Place a block of wood between engine and jack to avoid damaging sump.
ENGINE MOUNTING - RH
NOTE: Place block of wood between jack and engine sump to avoid damage
occurring.
7. Loosen alternator pivot nut and bolt.
8. Loosen bolt securing alternator adjustment bracket.
9. Loosen bolt securing alternator to adjustment bracket.
10. Rotate alternator drive belt adjustment bolt anti-clockwise to release
tension from belt.
11. Release and remove drive belt from pulleys.
12. Models with A/C: Remove alternator drive belt. See ELECTRICAL, Repairs.
13. Loosen 3 bolts securing A/C compressor to mounting bracket and position
compressor aside.
7. Remove 2 bolts securing RH mounting bracket to engine.
8. Remove camshaft timing belt lower front cover. See this section.
------------------------------------------------
Refit - Engines fitted with manual timing belt tensioner Type A only
1. Clean crankshaft pulley, timing belt gears, coolant pump drive gear and tensioner pulley.
CAUTION: If the sintered gears have been subjected to prolonged oil contamination, they must be soaked in a solvent bath and then thoroughly washed in clean solvent before refitting. Because of the porous construction of sintered material, oil impregnated in the gears will emerge and contaminate the belt.
2. Check correct alignment of camshaft timing marks for 90° BTDC and that tool 18G 1570 is locking camshaft gears.
You will need to use the breaker bar to undo the hex bolt holding the tensioner and a cranked 8mm ring spanner to remove the slider bolt.
Re-fitting the cam belt.
Leave the car in gear when re-fitting, you don't want to turn the crank!!!
Make sure you have enough tension on the 'driven side' of the belt (nearest
the bukhead. Get the belt onto the exhaust pulley first, only push it
on by 5mm or so.
It is likely that the cams have forced the pulleys apart a little, you
need to ensure that the belt is not too slack (take note how tight the
original belt was) It may be necessary to rotate the two cams towards
each other with 17mm spanners (WITH CAM LOCKING TOOL IN PLACE) this can
give you that important half tooth to get the belt on the inlet pulley.
Now just the waterpump and tensioner. From experience I have found that it is easier to place the belt around the waterpump and then fit the big tensioner bolt (if you fit the big bolt before getting the belt around the tensioner you'll make your life a lot harder) you can just about see what you're doing if you bend the metal wheel panel into the wheel arch (bend it back again afterwards.
Setting the tension is fun. use a LONG screw driver to push the slider
up and use the 8mm setting bolt to hold it whilst doing up the big hex
bolt with the breaker bar.
Refit lower cover
1. Fit lower cover and tighten bolts to 9 Nm.
2. Fit crankshaft pulley. See this section.
------------------- .
Refit crankshaft to pulley
1. Clean crankshaft to pulley mating faces.
2. Fit crankshaft pulley.
3. Fit crankshaft washer and tighten centre bolt to
205 Nm.
-------------------
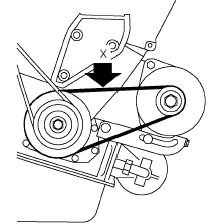
6. Check condition of alternator drive belt. Renew a belt that shows signs
of wear or splitting.
7. Apply a force of 10 kg to alternator drive belt at position ’X’
and measure the deflection
between crankshaft pulley and alternator pulley. Deflection must be 6
- 8 mm.
6. Refill coolant system.
---------------------------------
Refill coolant
6. Flush system with water under low pressure.
CAUTION: High pressure water could damage the radiator.
7. Connect coolant hoses at the rear of the underfloor coolant rail, secure
with clips.
8. Prepare coolant to the required concentration.
See INFORMATION, Capacities, fluids and lubricants.
10. Remove bleed screw from radiator, and open heater bleed nipple.
11. Fill the system with coolant.
NOTE: To prevent introducing air into the system, keep the expansion tank
filled.
12. When a constant flow of coolant is being emitted from both bleed points,
close bleed points and tighten to:
Radiator bleed screw 5 Nm ,
Heater bleed nipple 7 Nm .
21. Release clip and remove inlet air hose from throttle housing.
22. Top-up the expansion tank with coolant.
14. Fit expansion tank filler cap and start the engine.
15. Run the engine until the radiator cooling fan operates.
NOTE: DO NOT operate the air conditioning (if fitted).
16. Check the cooling system for leaks, and that the heater is emitting
heat.
17. Switch off engine
18. Check level of coolant, top-up to ’MAX’ mark on expansion
tank if necessary.
23. Remove bleed screw from radiator return rail.
24. When a constant flow of coolant is being emitted from bleed point,
fit bleed screw and tighten to 9 Nm.
25. Fit inlet hose to throttle housing and secure with clip.
17. Switch off engine and allow to cool.
27. Check level of coolant, top-up to ’MAX’ mark on expansion
tank if necessary.
---------------------
Check all bolts and do a test run of the engine
If any squiking noise appears, then re-check the cam belt tension.
1. Fit timing belt upper front cover, ensuring seal is located correctly.
2. Fit bolts and tighten to 9 Nm.
3. Fit engine cover.
ENGINE COVER
Refit
1. Position cover and secure with bolts.
2. Fit sound deadener pad.
3. Fit hoodwell trim. See BODY, Interior trim components.
4. Connect battery earth lead.